Wednesday, November 23, 2011

Pain de Mie (Roti Tawar )

INGREDIENTS

230 ml d'eau (ou jus de pomme ou lait )
2 càc de sel
20 g de margarine fondue
2 càs de sucre
450 g de farine
1 càs de levure sèche


PREPARATION

1
Mélanger tous les ingrédients et pétrir.
J'ai utiliser ma MAP en mode pâte et le résultat est fabuleux !
2
Laisser lever pendant une heure (si vous utilisez la MAP, cette étape est comprise dans le programme).
3
Prendre la pâte et lui donner la forme de votre moule (à cake de préférence) et laisser lever a nouveau environ 3/4 d'heure (tout dépend de la température de la pièce, la pâte doit être bien levée et avoir doublée de volume).
4
Enfourner à 200 degrés pendant 30 minutes. 5 minutes avant la fin de la cuisson, j'ai sorti le pain du moule pour laisser le bas dorer !

 source : http://www.750g.com/fiche_de_cuisine.2.123.16400.htm :


 -------------------------------------------------------------------------

Makes 16 buns
[Ingredients]
375g bread flour
100g plain flour
35g milk powder
75g caster sugar
3/4 teaspoon salt
1 sachet (7g or 2 1/2 tsp) instant dry yeast
1 egg, lightly beaten
150ml (approx.) lukewarm water, adjust as necessary
40g butter, cubed

Water-Roux Paste
25g (just under 2 tbsp) bread flour
125ml (1/2 cup) water

* Water-Roux is basically 1 part bread flour to 5 parts water.
http://cornercafe.wordpress.com/
[Preparation]
Water-Roux
Mix flour and water in a small saucepan. Cook over low to medium heat, stirring continuously until it reaches 65ºC. It should have thickened to a paste at this stage, that is when you stir you can see the bottom of the pan. Remove from heat, place a cling film over the paste and leave until lukewarm, or room temperature, before using. (Alternatively if you don’t have a thermometer, cook as before until it starts to thicken, then continue to cook for about 1 more minute before removing from heat.) This water roux can be kept in an airtight container after cooling in the refrigerator for 1 day if not used immediately. However DO NOT USE if it turns grey in colour, that means it has gone bad.
Water_Roux_Paste
Water-roux paste.
For the Bun Dough:
1. Sift bread flour, plain flour, milk powder, caster sugar and salt onto the working surface. Add instant dry yeast and mix well. Form the flour mixture into a well. Add lightly beaten egg and lukewarm water roux and mix in. Gradually add just enough lukewarm water to form into a slightly sticky, soft dough. Knead for 10 minutes until smooth and elastic. During hand kneading, the dough also needs to be thrown onto the working surface once every few minutes between kneading to improve the dough structure. (I usually just pick up the dough to about head-high and throw it down onto the working surface 10 to 20 times every few minutes between kneading.)
2. Knead in butter until incorporated. (In many cookbooks, they mentioned that the dough at this stage should be able to be pulled and stretched into membrane, but it’s hard to achieve with hand kneading. I usually stop kneading when the dough sticks to the work surface and stretches like chewing gum when pulled!) Form the dough into a round ball and let it rise until double in size in a large greased bowl, cover with cling film (should take about 1 hour in warm weather, longer in winter months). Optimum room temperature for this first prove is 28°C with a humidity of 75%. To test if the dough has risen properly, dip a finger into bread or plain flour and poke down into the centre of the dough as far as your finger will go and pull out again – the hole should remain if it is ready. If the dough springs back, then it is not ready, continue to prove further.
3. Punch down, knead briefly and form into a ball shape. Then divide into 16 equal portions. The easiest way is to first divide equally into 4 larger portions first, then divide each of these again into quarters each. Form each into balls and let rest for 10 minutes.
Plain Water-Roux Buns (before final proving)
Plain water-roux buns before final proving..
4. Shape and fill the buns according to recipe. Place all finished buns on a greased baking sheet, lightly cover with cling film, and let rise until double in size (about 1 hour in warm weather, longer in winter months). Optimum room temperature for this final prove is 38°C with a humidity of 85%.
Plain Water-Roux Buns (after final proving)
Plain water-roux buns after final proving (double in size).
5. Bake in preheated 190°C oven for about 12 to 15 minutes, or until golden brown.
Plain Water-Roux Buns
Plain water-roux buns after baking.

Monday, November 21, 2011

Kue Putu

Bahan kue putu

250 gram tepung beras
100 ml air mendidih
2 sdm perasan air daun suji
1/2 sdt pasta daun pandan (jika tidak ada daun perasan daun pandan asli)
1/2 sdt garam
175 gram gula merah, iris tipis
140 gram parutan kelapa, kukus dengan sedikit garam

Cara membuat kue putu bumbung

Kukus tepung beras selama 60 menitan (1 jam) dengan api sedang. Setelah itu angkat, tuang air mendidih, air daun suji, pasta pandan, dan garam. Aduk hingga rata. Setelah itu ayak (saring) adukan tepung beras yang sudah tercampur tadi sehingga tidak menggumpal. Ambil cetakan bambu dengan ukuran lebar 3 cm dan tinggi 7 cm. Jika tidak ada cetakan bambu (bumbung), dapat digunakan cetakan kue dengan ukuran tersebut.
Masukkan hasil ayakan tepung beras tadi kedalam cetakan bumbung sepertiganya. Sedikit ditekan supaya agak padat. Beri 1-2 irisan gula merah, lalu penuhkan kembali dengan ayakan tepung sampai agak padat. Letakan bumbung (cetakan) diatas dandang yang beralaskan sarang dengan lubang-lubang. Lubang-lubang ini merupakan jalan uap untuk mematangkan Kue Putu. Kukus kue putu hingga matang.
Keluarkan dari kukusan, sajikan Kue putu dengan taburan kelapa parut dan ditemani minuman wedang jahe. Cukup untuk 20 pieces kue putu. Selamat mencoba dan Selamat berakhir pekan!

sumber  http://resepnusantara.blogspot.com/2011/04/resep-kue-putu.html


==================================

Sumber : Primarasa Indonesia, Kue Tradisional Nusantara
Bahan:
300 ml air
1/2 sdt garam
2 lembar daun pandan
1/2 sdt pewarna hijau
375 gr tepung beras kering
125 gr gula merah, iris tipis
Taburan, campur, kukus hingga matang:
150 gr kelapa setengah tua, kupas kulit ari, parut panjang
1/2 sdt garam
Cara:
  • didihkan air, garam, daun pandan, pewarna hijau, angkat, biarkan hangat. masukkan tepung beras dalam wadah, tuangi air pandan hangat sedikit sedikit sambil diaduk dengan tangan hingga berbutir butir halus, lakukan sampai air habis.
  • Siapkan saringan kasar, masukkan adonan tepung, gosok gosokkan hingga adonan tepung berbentuk butiran halus, tampung, lakukan hal serupa hingga selesai
  • Ambil cawan ukuran 30 ml, tuang 1/2 sdm adonan tepung, lubangi bagian tengahnya dengan telunjuk, masukkan gula merah, tutup dengan 1/2 sdm adonan tepung beras (jangan di tekan), ratakan.
  • Balikkan cetakan yang berisi adonan ke atas loyang datar beralas daun pisang, angkat cetakannya. Atur jarak antara adonan yang sudah dicetak, jangan berdekatan, lakukan hingga loyang penuh.
  • Kukus dengan api besar 10 menit, angkat, pidahkan ke wadah datar, sajikan selagi panas dengan taburan kelapa.
note dari ine:
- Jika menggunakan bambu sebagai cetakan, masukkan sepotong kecil daun pisang atau pandan, sebagai alas cetakan, isi dengan tepung dan gula sebagaimana step3. step nomor 4 dilewati. letakkan bambu dalam keadaan berdiri persis di atas lubang lubang kukusan (jika lubang besar dan jarang2)
- Dalam rangka back to nature, gunakan daun suji sebagai pewarna, bikin dulu air suji, baru di tambah air dan diukur mencapai 300 ml.

nemu di internet resep dari sini:  http://bankresep.wordpress.com/2007/06/30/kue-putu/

Sunday, November 20, 2011

Cumi Hitam / Sotong


Out of blue, after having lunch with my good buddy, I'm craving for cumi hitam ( my mom called it Sotong item ) and I told her that I want to cook a sotong ( cumi item ) with plenty of green chilli ( I mean really plenty.. I mean like, after done eating,  your mouth feel like on fire.. ), It would be so much fun,  but I need a buddy to eat with me. that what said to her.. but surprisingly she put her up and said.. I'm in Beib.. I love that dish too.. let's do it soon.
So Since we plan to meet today, I specially cook the dish without telling her... just for surprise.. unfortunately she got stuck in the middle of some errand. So, I eat it by myself. and still delicious (ofcourse )

Ingredients :
4 big Fresh Calamari ( if you can ask some body to clean the inside of calamari, ask them to keep the ink stay.because most some people don't like the ink )

4 Shallots 
5 Garlic
15 big green chilli 
10 small green/red chilli 
3 cm Ginger ( peal it and slice thin )
1tsp sugar ( optional )
3 lime leaves 
2 Daun Salam (bay leave optional if you don't have Daun salam )
1tsp Sea Salt
1 branch of lemongrass ( cut it thin slices )
1/4 tsp Pepper 
4 Tbsp Vegetable oil 


How to make it

Slice thin all the ingredients : Onion, Garlic, Chilli,ginger,Lemongrass  put it aside ,


Method : 

1. Wash properly all , the 2 type of chilli ( Red and Green chilli ),Shallot, Garlic, Ginger ( peel the skin of first before slices )  - Slice thin all of them .. put a side


2. Into frying pan,  place  the vegetable oil, when is hot enough fry  all ingredient one at the time starting with  the shallots, garlic, 2 types of chilli,ginger, Lime leave,lemongrass.
Cook about 10 minutes and add the calamary, lower the fire for shimmer for total timing approximately 20 minutes, adding 1/2 glass of water 


3. Add the pepper,sea salt sugar and continue to shimmer until the liquid has evaporated
Remove from heat and put it in the bowl.


4. Serve warm  with warm Rice

Tuesday, November 15, 2011

Balado Makarel


Since I have a farmer market next to my house every Saturday morning, I can get fresh fish on that market. I start to make the habit to have Fish day on Saturday. My boys seem waiting for that day. They prefer Fish instead of Meat.Ok.Ok..Of course they eat without the sambal balado in it. that's  balado menu is only for me..


Sambal Balado Makarel Recipe
Ingredients:

3 big fish ( Makarel )
1 big lemon ( squize and get the juice out 0
1 tsp sea salt

10 long red chilies (cabai merah keriting)
  5 big shallots
4 cloves garlic
1 red Tomato ( people from padang sometime didn't use the tomato to avoid the reduce of the hot spice from the chilly )
1 tsp sea salt
 Vegetable oil for fry


Methods:
1. For the Fish.. clean up the inside, cut it in 2, put in the plate , add the lemon juice and sea salt on top of the fish, put a side to marinated about 15-20 minutes.
2.For the Balado sauce ,With a food processor, combine shallot, garlic, red chilies, sea salt, and tomato until smooth but not too fine.
3. Fry the fish and flip it to make the fish cook even. put a side , still using the same oil, fry the sambal, you can continue to stir frying the sambal mixture until you can smell the aroma or the oil start to come out/bubble.
4. Add the fry makarel on the balado sauce pan, mixed well ( about 5 minutes )

Friday, November 11, 2011

Fondant au Chocolate

The best way to eat the Fondant au Chocolat is when it just out from the oven..creamy heaven melted in your mouth in the second you scoop in your mouth.

Fondant au Chocolate

Makes 12 muffin-size
You need:

  • 180 gr unsalted butter
  • 150 g Dark Chocolate
  • 75 g Castor Sugar
  • 45 g flour
  • A pinch of sea salt
  • 6 large egg  ( use only 3 whole eggs and 3 egg yolks 
  • 1 teaspoon pure vanilla extract ( optional ..sometime I use but most of the time I'm not using it)
Steps:
  • Preheat the oven to 180 C and have 8 muffin molds ready (You can also place paper cases inside muffin molds or if you have silicon muffin mold, you can place the chocolate dough right away no need the paper case ); set aside.
  • In a small pot, melt the butter + Chocolate in microwave about 2 minutes ( until the chocolate melted) Let cool slightly.
  • In the bowl of combine the eggs,sugar, salt . Mixed them well until the dough smooth.
  • Pour the butter+ Chocolate inside 
  • Add the flour batter Mixed about 5 minutes
  • Cover the dough and place in the refrigerateur about 1-2 hr before cook.    
  • Bake for 10 minutes, or until the blade of a sharp knife comes out dry when inserted in the middle. Let cool and dust with confectioner’s sugar, if you like, when serving.


Saturday, November 5, 2011

Brioche


It was hard to find a good simple brioche.
I've been searching the recipes of brioche from everywhere but only this simple one can fulfill my satisfaction... I got it from book of Francoise Bernard recipe book that I already translate.


Ingredients:
1/4 Kg (250grams ) flour
100 Grams  of dry raisin
100 grams of Butter (put 3-4 hr outside of fridge /room temperature before use )
2 medium Eggs
3 Tbsp of Sugar
1tsp salt
1/2 glass of warm milk
1 sachet/packets of active dry yeast (each packet s is 5.5gr ) (french yeast = levure boulanger )


Directions:
* In big bowl, put Flour, sugar and dry yeast, mixed well with wooden spoon.
* Prepare a mixer electric , with a dough hook attachment, add the eggs and salt  in the big bowl of flour and dry yeast. Mix until blended. Add gently the warm milk while the mixer keep on until the dough become incorporated ( elastic ).
*Take dough out of mixer bowl,Cover it with kitchen cloth/plastic wrap  ( about 3-4 hr ) until the dough doubles in size/raise.
* Take dough out place it in the flat surface so you can working on the dough.
* in the table cover with flour, Punch the air out of the raise dough, Roll braided gently  ( add some more flour to avoid the sticky in your hand), add the raisin  and cut into 3 equal parts, form into a ball , place it in the bake pan and let sit in a cool place until doubles in size ( I would just leave it all night )


* In the morning prepare the oven 180C

Put the dough in the oven about 30 minute, when is cook let the bread cool off ( about 10 - 20 minute ) before you can eat..

Bon Appetit


Cara buat in Bahasa

* Dalam mangkuk besar :
* Masukkan Tepung, Yeast & gula.. aduk rata dgn sendok kayu
* Masukkan Telur lalu mulai aduk dgn mixer electric dengan spatula special yang untuk buat bread.
* Lalu masukkan secara perlahan-lahan susu hangat kedalam mangkuk sambil terus di aduk hingga adonan elastis...
* Tutup adonan dengan kitchen towel ( serbet ) Diamkan selama 3-4 jam hingga adonan mengembang ( kalau saya, dibiarkan semalamam )
* Setelah adonan mengembang, tekan2 adonan hingga mengempis. supaya tangan tidak lengket, taburi adonan dgn tepung ( jgn ragu untuk menambah tepung kedalam adonan )
* Setelah adonan selesai di uleni.. bagi adonan menjadi 3 bulatan, masukkan ke tiganya ke dalam loyang kotak.. Tutup lagi sekitar 2-3 jam ( Hingga adonan mengembang memenuhi loyang )
* turn the oven 180C
* setelah oven sudah mencapai 180C masukkan adonan kedalamnya * masak selama 30 menit
* Setelah masak, keluarkan & biarkan bread dingin sebelum di hidangkan ( sekitar 20 menit ).

Thursday, November 3, 2011

Bubur Ketan Item

This is the first time I try this childhood dish of mine. On some recipe the rice glutant should be prepare 6 hr before you cook it. But I just did right away without any preparation and.. Working just fine.

How to Make it is pretty easy..

2 cup of rice measurement black glutinous rice ( some people do  4 to 5 hours soaked before process or overnight  but Me)
1 Pandan leaves, torn and tie a knot
1 Liter   water, more cups if required
½ cup palm sugar ( gula merah ), shaved-- I use  mixed brown sugar (substitute ) and regular custor sugar
1 cans of thick coconut milk
Sea salt to taste 
How to make coconut sauce

Place the coconut milk in a pot, add 3 pandan leaves *torn and tie a knot.
Cook over medium heats, stir continuously, seasons with salt.
When its almost bubble, remove from the heats and let it cool.
Transfers into a jar, keep refrigerated


Method : 

1. Wash properly and rinse black glutinous rice well under running water, Drain. 
at some recipe they said to soak the black glutinous rice 4-5 hr or  overnight, ( I just wash the black glutinous rice and cook right away )


2. Into deep pot place 1ltr of water and pandan leaves , 
add  black glutinous rice.
boil over high heat and lower the fire for shimmer for total timing approximately 30 minutes, adding more water if required ( I cook almost to 1 hr and add some more water if required )


3. Add the sugar and continue to shimmer until most liquid has evaporated 
or a slight thicken for another 10-15 minutes, season with sea salt ( Pinch )
Remove from heat and allow to cool.


4. Serve warm  with coconut sauce


Wednesday, November 2, 2011

The Thing about Autumn... Fresh air

In this occasion I'd like to thank  Dian Degen from Swing your cooking spoon! for giving me this Heart Locket Award. And now I have to find 7 wonderful blogs to pass this award to them. If you receive this award, please read the rules carefully:
  1. If you get this award, pass it on to other 7 blogs
  2. Put in the award picture in your post
  3. Don't pass the award back to the award giver
  4. Answer the questions below and post them in your blog:
1. What make you feel great about yourself?
2. Who inspires you most?

My answers:
1. I feel great about myself because I'm Surrounded by great family and friends. Is Not easy to be someone who talk straight forward like me, could hurt people by accidently  but if they are really truly friend of me, they will accept the way I am. I except if someone reminds me and talk frankly If I've made a mistake/hurt them, that's teach me for not make the same mistake again in future and that's also make the friendship stay.
2. Living abroad is not easy at all, but if you can blend and enjoy it, you will find the beauty of living abroad.  My hubby is the one who inspired me the most. but I got a few  good friend in the other side of the world who inspired me too ..I'm glad to have them as a friends.

And the Award that's inspired me, goes to 7 Wonderful blog  :

  1. La tartine Gourmande at La Tartine Gourmande 
  2. Ira from  Cooking Tackle
  3. Arfi at Homemades
  4. Peppy atIndonesian Eats
  5. Rita at Mochacocolaterita 
  6. Ipoek at Dapur Ipoek
  7. mommy nya nisa at Rumah manis


Heart Locked Blog Award


The Autumn season is always make me lazy. I'm not sure that is because the soft fresh weather of Autumn or it just me who just like cuddling with my soft cozy blanket in my bed.  Well, forget about the cozy blanket, since my boys still have  one more holiday, I still have to cook. This time I choose Beef stew nutmeg or they called Semur Sapi in Indonesia. This dish usually for kids meal. I often find this menu on my childhood menu. Yep, My mom love to cook this dish for her kids. Since I live abroad, I like to introduce Indonesian dish to my kids, sometime they like it, sometime they don't but at least they try to taste many kind of meal so when they are visiting my parents they will not get food shock. For this dish, I modify a bit just because of the rich flavor of semur sometime can't digest kids taste.
so here is the menu for Autumn : 

Semur Daging Sapi 
Beef Stew Nutmeg


Semur Daging Sapi


Ingredients:

350 g beef (I used veal )
5 pcs Indonesian bay leaves (salam leaves)
1 tbsp vegetable oil
3 shallots, chopped
7 clove garlic, chopped
1/2 tsp  freshly grated nutmeg
7 pcs of cloves ( mostly I didn't use due to kids doesn't really like the taste of cloves! )
4 cm ginger
1 tomato ( peeled the skin, cut it and blend with all the ingredients )
1 sachet coconut powder ( sometime I use, sometime not, depend on the stock )
4 Tbsp Indonesian sweet soy sauce (I use kecap cap Bango, the sweetness are perfect but if you can't find other sweet soy sauce is fine too )
2 medium size potatoes , peeled and cut 2 cm cubed
ground white pepper to taste
fried shallots and other green stuff to garnish
Salt, Pepper as desired

Methods:
1. In a frying pan, fry  potatoes, put a side
2. Still using the remaining oil, fry all the blend ingredients (the shallots,Garlic, Tomato, ginger)  add salam leaves.
3. Bring the meat inside, cook for approximately 25 minutes.
4. Add the rest of the ingredients Including the potatoes , reduce heat  and cover the pan about 1.5  hours or until the meat is cooked and very tender.
5. Garnish with fried shallots or green onion.
6. eat with hot rice and sambal mentah...

Tuesday, November 1, 2011

Velouté de Cepes

 Ingredient 

1 or 2 big Cepe Mushroom
100gr Chataigne ( walnut )
40 gr butter
2 tbsp olive oil
20 gr of ground veal
1 stalks of cellery ( cut/ cop in small piece )
1 stalks of Poireau  ( leek ) ( Cut in small piece )
1 Onion
1 Garlic
1 boulion
650ml water 
20 cl créam fraíche
Salt/pepper 

Direction :
Clean Up the Mushroom 'Cepe ' by peel the skin & cut the dirty edge /part. cut in small pieces.
Fried Onion, Cellery with olive oil about 4-5 minute, add  garlic, ground veal ( about 2 minute )
Add Cepe, Poireau & Butter.
Add the Bouillon  & Watter
Add  Salt & Pepper
Cook about 1hr in low fire.
Add the cream fraiche    cook another 10 minute
Blend all the ingredient in the pant till smooth.
Serve while still hot.


Bon Appetit


Autumn in France

The thing I love the most in autumn season is the changing color of three and the comfortable weather  before the cold season come.


Sunday, October 30, 2011

Grilled Fish ( Ikan Bakar/ Panggang )


I've been planning to post a recipe of this grilled fish since last August.
The lazy mood of writing and blogging have been attack me since then.  For time being I just post the picture. Recipe coming son.

Voila, so here is the recipe ;

Ikan Bakar


Ingredients
2 Pcs of big fish (I used Sea Bas fish / Bar(francaise ) / Ikan gurame( Indonesia ) )
2 pcs of lemon ( just need the juice )
6 of basil leaves (kemangi leaves)
1 tsp turmeric leaves
1 tsp pepper
5 lime leaves
5 leaves for shredded and tear off the rest
2  cm of Ginger, peeled
2 lemongrass, take the white part and bruised
8 shallots
5 Garlic
Salt as desired


Directions
1. Squeeze lemons over fish and blend all the ingredients
2. Rub fish with the blend ingredients marinate  for 30 minutes or let it more.  and cover it
3. Reheat the oven or BBQ grilled .. Place fish, and BBQ/ grilled the fish about 45 minutes or until done.

Tuesday, October 25, 2011

Rib Soup for WInter ( Iga Soup)

Ribs Soup ( Iga Soup  ) is one of my mom favorite soup. She will cooked this soup no mater the weather is hot or cold ( Well, Jakarta never been as cold as Europe where I live now, but sometimes back then, when the rainy season come, it can be a bit cold too...just sometime!!!! ). the point is I found this soup often serve in every other week in our kitchen. so I called this is one of her cooking specialties. Usually my mom cooked  this soup only with 2 kind of vegie her kids love the most, Potatoes and Carrots. Potatoes for my brother and I'm the rabbit. Yep.. I'm the one that eat the carrots on this soup ( Of course  with the ribs too!! ). so each time we took the bowl soup. we have to struggle to collect our  favorite veggie on the soup. thinking about that time, I felt so silly.!! 
Back to the soup story. Since I have two picky boys who doesn't like or eat veggie ( except Salad and pumpkin soup!!! ). I often cooked this soup and believe it or not, They like it a lot.
Anyway, I'm just feeling great to be able to share the best memory  of my childhood. So, for those who have picky eater kids, why don't you give a try to make this delish easy soup on your kitchen.

Bon Appetit!!


Ingredients:
1 onion
6 cloves garlic
1 kilograms  of good Rib bones
4 stalks of fresh celery, cut into several sections
4 medium size of Potatoes, cut in 8
5 big size of carrot, cut in round
1 bouillon ( Compact broth in cube )
2 Litter of water
2 teaspoon sea salt, or more according to taste
1 teaspoon of pepper

SERVINGS
Parsely , finely chopped
Fried shallots
Andaliman Sambal
limes


Methods:

Boil Broth:
Fill your large pot with cool water. Boil water, and add the Ribs, keeping the heat on high. Boil vigorously for 1 hour. Bring to boil over high heat and lower to simmer.Put cloves, garlic, salt, bouillon, pepper, Celery.
Once the broth starts to boil, turn the heat to medium-low and allow it to simmer for 2 hours or longer. To make a good broth, it will take longer hours. The more time you are simmering it, the more flavour you’ll get. It’s important to keep the heat low.
After the broth has simmered for several hours, add the potatoes and Carot.
The soup ready to serve when the potatoes and carrot are cook.
Remove from the heat and serve while still hot.

Saturday, October 22, 2011

Onde Onde

Waktu pertama kali nemu kacang berwarna kuning di toko Asia, langsung girang setengah modar..serasa dapet loto banget.. dalam hati udah mikir ini kacang kedelai mau di buat tempe ah.. udah langsung siap dibungkus ajah setelah di masak selama 1 jam dan di taburi ragi tempe, ga perlu ngelotokin kulit kacang kedelainya seperti kejadian sebelumnya * masih terbayang sama tangan yang pada kriput karena kelamaan berkecipak kecipuk di air.
Dengan bangganya saya tunjukkin ke temen yang biasa buat tempe.. bukannya di kasih selamat karena sukses nemu kacang kedelei yg sudah tanpa kulitnya..ehh malah di ketawain si temen sampai dia sakit perut.Ternyataaaaa.. kacang kuning ini bukannya kacang kedelai yg sudah di kulitin..melainkan kacang Ijo yang telah di kulitin.!! duhhh malunyaaaaa...
Tapi temenku sempet nyeletuk.. enak nih kacang ini bisa di buat isi Onde Onde... Hah?? isi Onde2?? duhhh..bisa ga ya buatnya.. agak males juga sih mau buatnya, soalnya di sini ada toko china yg jual Onde2... 
But.. Let's the courage start...

Onde-Onde

Bahan Kulit :
- 1/2Kg tepung ketan
- 2sdm tepung beras
- 1 gelas kecil gula halus (ukuran gelasnya kira2 1/3 ukuran gelas blimbing)
- 1/4Kg kentang (kukus dan lumatkan hingga halus)
- 4btr kuning telur 
- Garam secukupnya
- Air secukupnya
- 200gr wijen


Bahan Isian :
- 1/2Kg Kacang hijau kupas, rendam kurleb 1 jam kemudian kukus hingga matang, setelah matang selagi hangat haluskan dan tambahkan gula halus. Untuk takaran gula halusnya terserah anda gampangnya cicipin aja tingkat kemanisannya sesuai selera kalo udah dirasa pas tinggal di bentuk bulat2. Ukuran juga terserah mau besar kecil monggooo... 


Cara Membuat Kulit Onde-onde :
1. Kocok gula halus dan kuning telur sampai tercampur rata, kemudian masukkan bahan2 lain   aduk rata kembali, tambahkan air sedikit demi sedikit sambil terus diaduk hingga adonan bisa dibentuk.
2. Ambil sedikit adonan kulit, bentuk bulat dan pipihkan. Isi dengan isian kacang hijau lalu tutup dan bulatkan kembali sampai kacang hijau terbungkus seluruh adonan kulit. Lakukan hingga adonan kulit habis.
3. Taburkan wijen dalam loyang lebar, taruh beberapa buah onde2 dan lakukan seperti gerakan mengayak (memutar juga boleh) hingga onde2 menggelinding dan kulitnya tertutup oleh wijen. 
4. Panaskan minyak kemudian goreng onde2 hingga berwarna kuning kecoklatan.. Minyaknya yang banyak ya sampai onde2nya terendam, metode gorengnya deep fried gitu kali ya..


*kalo liat onde2 jadi inget guyonan guru SD dulu, kata bule orang Indonesia itu rajin2 buktinya sanggup nempelin wijen satu2 ke kulit onde2..:P*

Friday, October 21, 2011

Sambal Andaliman


Sambal Andaliman is Well known as Sambal Batak. Spicy kicking in the mouth that what you will get when you eat this sambal . And this one of sambals that I miss from my mom home cooking. Most of my friends have their own favorite sambals that I made for them but  Me. I love almost every sambal. Can't live without sambal in any jar stock that's I made. The point is, I couldn’t live without chili pepper.
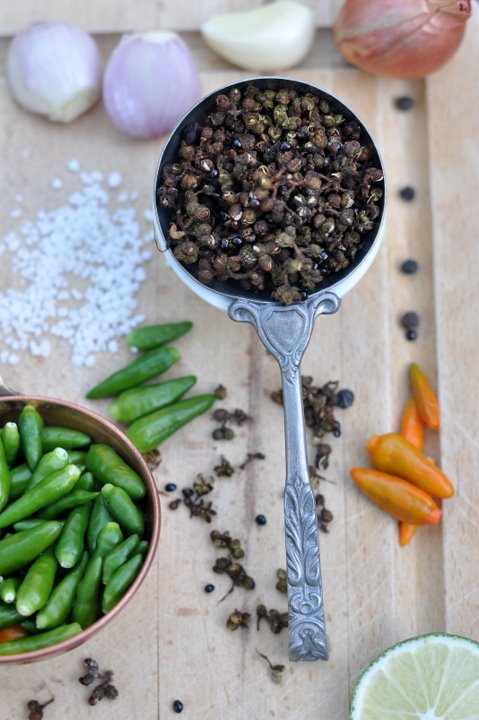
My mom always ask one of her helper to make a big jar of any sambal ( sambal terasi, Bajak, balado etc ) but this sambal is her specialty. She's really good in mixing all the ingredient. So, speaking of my mom, when I talked to her couple days ago, I asked her for her secret recipe for Sambal Andaliman. With the courtesy of my mom recipe, I have to twist her recipe a bit to make it simple. Since I got the Andaliman have been Roasted so What I have to do is just grind the Andaliman with the ingredient then fry the sambal or may be just eat fresh like that.
Usually I found this sambal when my mom made a Rib soup ( Sup Iga ),, so as the weather start to be chilli I made a Pot au Feu  de beouf ( Soup iga sapi )


Sambal Andaliman
Batak sambal

Ingredients:
95 grams green chilies
10 gr of Andaliman
1 tbsp of lime juice (1 green Lime )
8  pcs shallot
5 grams cloves garlic
1 big green tomat ( if you don't have you can subtitude with green cherry tomato )
1 teaspoon sea salt
pinch of sugar (optional)


 oil for stir frying ( some people like to eat this sambal uncooked )
2 stick of lemon grass
3 leaves lime leaves


Methods:
1. In a high heat, roast the Andaliman ( use as desired after that is good for storage in the freezer for months )
2. Grind the roasted Andaliman and all ingredients until smooth but not too fine ( Before you start to blend all the ingredient add the lemon juice first so the color of the sambal not to dark ). It’s up to you to choose a traditional way for grinding the ingredients into spice paste. I chose to use my favourite helper, a food processor to do the job for me.
3. In a wok or skillet, heat up the oil and stir fry the spice paste in the vegetable oil for a few minutes, then add the seasalt and  sugar. Keep stirring until the liquid evaporates and the oils start to come up.

Thursday, September 15, 2011

Oseng Oseng Kangkung

In Indonesia this Veggie is well known as Remedy for people who have sleeping problem. 

I didn't follow any friends recipe , I was just mixed and stuff with the spice until get the taste as I wanted. 

Honestly, I'm not making this dish very often because this type of veggie  is so darn expensive (*here in France compare to my hometown in Indonesia)

I have got to say that my  recipe is rather easy and relatively simple and you are definitely would relay on it for your quick simple cooking ! 

Ingredients
2 big green  chilly
2 Shallots 
3 Garlic
1 medium Tomato
a bunch of Kangkung ( Water spinach ) as desire 
2 tbsp oil
1 tbsp oyster sauce
1 tsp homemade sambal terasi (shrimph paste chilly sauce )
salt, Pepper
Pinch of sugar
half small glass of water
How to Cook

Slice thin the Onion , Garlic, chilly 
Cut the kangkung as you wanted
Reheat the oil in the pan
Fry the Shallots, garlic, Chilly
Add the kangkung, Oyster sauce, salt, pepper & watter ( cooked about 5-10 minutes )
Serve while still fresh out from the pan.


Monday, September 12, 2011

Pate a Chou / Profiteroles/ Kue Soes


In Indonesia this kind of cake is well known  as Kue Soes. this cake is always remind me of my childhood. I though it would be hard to make it, but apparently is pretty easy to make.
So I baked this cake for my love
 
For the choux pastry
 
For the chocolate sauce
  • 150gr  good quality dark Chocolate, broken into pieces
  • 150 gr Butter 
    Reheat until melted and mixed well

Preparation method

  1. Preheat the oven to 180C, Place a small roasting tin in the bottom of the oven to heat.

  2. For the choux pastry, place the water and butter into a large saucepan. Heat gently until the butter has melted.

  3. Turn up the heat, then quickly pour in the flour and salt all in one go. 
  4. Remove from the heat and beat the mixture vigorously until a smooth paste is formed. Once the mixture comes away from the side of the pan, transfer to a large bowl and leave to cool for 10-15 minutes.

  5. Beat in the eggs, a one at a time, until the mixture is smooth and glossy and has a soft dropping consistency - you may not need it all.

  6. Lightly grease a large baking sheet. Using a piping bag and plain 1cm/½in nozzle, pipe the mixture into small balls in lines across the baking sheet. Gently rub the top of each ball with a fork - this helps to make a crisper top. Brush the top of each ball with the yellow eggs so the profiteroles will not too pale when is cook.

  7. Bake for 20 minutes, or until golden-brow.


  8. Remove from the oven and turn the oven off. Prick the base of each profiterole with a skewer. Place back onto the baking sheet with the hole in the base facing upwards and return to the oven for five minutes. The warm air from the oven helps to dry out the middle of the profiteroles.

  9. For the filling, lightly whip the cream with the orange zest until soft peaks form. When the profiteroles are cold, use a piping bag to pipe the cream into the profiteroles.
  10. For the chocolate sauce, place the chocolate and butter into a small saucepan and bring to the boil to make a frosting, heat and stirring occasionally until smooth and well combined. Pour the Chocolate mixture into the profiteroles.

  11. To serve, place the stuffed profiteroles into a large serving dish and pour over the chocolate sauce. Serve hot or cold
========================================================
For the cream filling/ Créme Patissiere
Ingrédients (pour 6 personnes) : - 1 litre de lait - 100 g de farine - 200 g se sucre - 4 jaunes d'oeuf - 1 gousse de vanille, du café, du cacao… le parfum de votre choix Etapes clés :
- Mélanger les jaunes d'oeuf avec le sucre. Battre au fouet jusqu'à que le mélange blanchisse
Ajouter la farine et bien à l’aide d’une cuillère en bois et détendre le mélange avec un peu de lait
- Mettre le reste du lait à chauffer avec le parfum choisi dans une casserole à fond épais
- Lorsque le lait est tiède, ajouter le mélange précédent. Remuer de façon continue, d’abord au fouet puis à l’aide d’une cuillère en bois.
- La crème va épaissir progressivement.
Arrêter la cuisson lorsqu’elle nappe la cuillère puis débarrasser dans un saladier. Elle va continuer à épaissir en refroidissant.
Filmer au contact ou recouvrir d’une petite pellicule de beurre fondu pour éviter d’une peau ne se forme à la surface de la crème.
- Mettre au réfrigérateur et utiliser lorsqu’elle est bien froide.

Sunday, September 4, 2011

Harvest this Year

Well, can you imagine how success the person can growth this big giant Onion on her garden..